NuGet repositories are great for downloading assets, they provide version control, access control and are web based (http protocol). The features available are extensive and can be integrated with many different platforms.
NuGet was originally distributed with Visual Studio 2012 as a package manager for .Net assemblies and binaries. Open source NuGet has grown and has been utilized for other repositories such as The PowerShell Gallery and Chocolatey, our goal is to use an open source NuGet server to provide private repositories for both PowerShell and Chocolatey packages. Part one will cover a minimum feature tool with just enough functionality to host a few packages for your project, part two will cover the full featured package that is used to host the PowerShell Gallery along with some customization techniques.
All my articles are written covering all aspects of the deployment, just skip the sections you feel comfortable with. This article is based on PowerShell 5.1 and IIS in a native server deployment. Future installments will cover NuGet in a Linux docker container on .Net Core. I also plan to modernize this system and support the latest PowerShell 7.x, PowerShell 7.x isn’t natively supported in any operating system to date so support must be added, slowing the adoption.
Prerequisites
This build is based on Windows Server 2022, we must install a few components including IIS at a minimum.
Install IIS: Install-WindowsFeature Web-Server,Web-Common-Http,Web-Mgmt-Console,Web-Asp-Net45
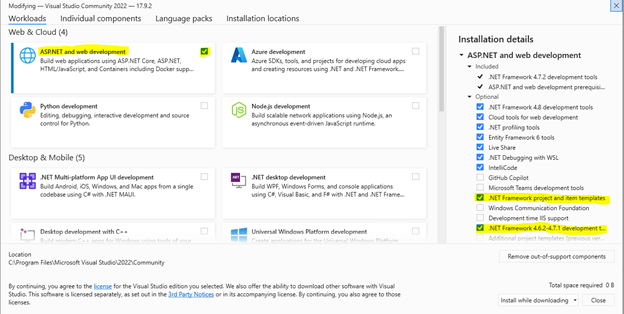
Visual Studio Community - Visual Studio 2022 Community Edition – Download Latest Free Version (microsoft.com) Include the following components:
- APST.NET and web development workloads
- .Net Framework project and item templates
- .Net Framework 4.6.2-4.7.1 development tools

Host aliases, certificates, and web sites.
You’ll need to create these resources with the intended audience in mind. If the intended audience is internal customers, you can do everything internally, if your audience is external or if you want to support many different cloud platforms from different vendors, you’ll choose different options here. Suffice it to say, are you using a publicly hosted internet domain or an internal AD DNS Server. In either case you’ll need access to this domain to add CName records that point to the Fully Qualified Host name of the web server. You’ll need a certificate, and you’ll need a web server.
If you don’t already have an A record in the authoritative DNS server for the domain, create the A record and create four CName alias that point to the webserver. Name these anything you want but they should be descriptive, for example:
posh.abc.local will be our PowerShell module repository, here is where we’ll publish our customized PowerShell modules with routines designed to support our customers.
choco.abc.local will be our Chocolatey repository, we’ll use chocolatey to package customizable software packages for deployment to our customers.
boot.abc.local is nothing more than a method of deploying a PowerShell script that is used to prepare machines for management by this system.
pull.abc.local is the web interface to the DSC Pull server.
If you plan on doing this as a large deployment, you might consider building two of these with load balancing for redundancy purposes, this is outside the scope of this article.
Small deployment for internal customers, use a self-signed certificate, it’s not truly secure but we are not securing anything not already provided to your audience. You should never post a secret on any of these systems, if you need to provide a secret, use a secret vault, which should be included in your design as well. I’ll include an article about hosting a secret vault as well.
The easiest way to create a self-signed certificate is with PowerShell:
$rootDomain = 'abc.local'
$certPassword = '1234'
$cert = New-SelfSignedCertificate `
-Subject "*.$rootDomain" `
-DnsName "$rootDomain", "*.$rootDomain" `
-CertStoreLocation "cert:\LocalMachine\My" `
-FriendlyName "*.$rootDomain" `
-TextExtension "2.5.29.37={text}1.3.6.1.5.5.7.3.1" `
-KeyUsage DigitalSignature,KeyEncipherment,DataEncipherment `
-Provider "Microsoft RSA SChannel Cryptographic Provider" `
-HashAlgorithm "SHA256" `
-NotAfter $(Get-Date).AddYears(10)
$DestStore = New-Object -TypeName System.Security.Cryptography.X509Certificates.X509Store -ArgumentList 'root', 'LocalMachine'
$DestStore.Open([System.Security.Cryptography.X509Certificates.OpenFlags]::ReadWrite)
$DestStore.Add($cert)
$DestStore.Close()
New-Item -Name 'Boot'-Path "$env:systemdrive\inetpub" -ItemType Directory -Force
$certPW = ConvertTo-SecureString -String $certPassword -Force -AsPlainText
$cert | Export-PfxCertificate -FilePath $($env:systemdrive + '\inetpub\Boot\' + ($rootDomain.Replace('.','DOT')) + '.pfx') -Password $certPW
This will create a self-signed, wild card certificate that expires in 10 years. It will be stored in your personal certificate store in your machines certificate store, it will export the certificate, include the private key, and assign a password to a folder under inetpub. It will also make a copy of this certificate root certificate store to full trust itself as a certificate publisher.
If you plan on standing up this system on a public interface, I’d look at automating the certificate with Let’s Encrypt. I’d also recommend standing this up behind a firewall and I would highly recommend using the full featured NuGetGallery. - https://github.com/NuGet/NuGetGallery
This starts off by removing the default web site.
# Removing the module will abort any pending changes; reload the module
IF (Get-Module IISAdministration) {Remove-Module IISAdministration};Import-Module IISAdministration
# Remove the Default web site
If (Get-IISSite | ?{$_.Name -eq 'Default Web Site'}) {Start-IISCommitDelay;Remove-IISSite `
-Name 'Default Web Site' -Confirm:$false;Stop-IISCommitDelay}
#Remove the wwwroot folder
Remove-Item -Path C:\inetpub\wwwroot -Recurse -Force
Reduces the possibility of binding conflicts using port 80.
Then create the three web sites for posh, choco and boot (the pull site is created later in PowerShell)
$rootDomain = 'abc.local'
$thumb = (Get-ChildItem Cert:\LocalMachine\My\ | ?{$_.Subject -like "*$rootDomain"}).Thumbprint
Start-IISCommitDelay
New-Item -Name 'posh' -Path "$env:systemdrive\inetpub" -ItemType Directory -Force
$iisPosh = New-IISSite -Name 'posh' `
-PhysicalPath $($env:systemdrive + '\inetpub\posh') `
-BindingInformation $('*:443:posh.' + $rootDomain) `
-CertificateThumbPrint $thumb `
-CertStoreLocation 'Cert:\LocalMachine\My' `
-Protocol https `
-SslFlag DisableLegacyTLS, DisableTLS13 `
-Force -Passthru
New-Item -Name 'choco' -Path "$env:systemdrive\inetpub" -ItemType Directory -Force
$iisChoco = New-IISSite -Name 'choco' `
-PhysicalPath $($env:systemdrive + '\inetpub\choco') `
-BindingInformation $('*:443:choco.' + $rootDomain) `
-CertificateThumbPrint $thumb `
-CertStoreLocation 'Cert:\LocalMachine\My' `
-Protocol https `
-SslFlag DisableLegacyTLS, DisableTLS13 `
-Force -Passthru
New-Item -Name 'boot' -Path "$env:systemdrive\inetpub" -ItemType Directory -Force
$iisBoot = New-IISSite -Name 'boot' `
-PhysicalPath $($env:systemdrive + '\inetpub\boot') `
-BindingInformation $('*:443:boot.' + $rootDomain) `
-CertificateThumbPrint $thumb `
-CertStoreLocation 'Cert:\LocalMachine\My' `
-Protocol https `
-SslFlag DisableLegacyTLS, DisableTLS13 `
-Force -Passthru
Stop-IISCommitDelay
Note, New to Server 2022 is TLS 1.3, as far as I know this security protocol hasn’t been adopted enough yet and should be disabled. Lagacy TLS protocols below version 1.2 should also be disabled, leaving only TLS 1.2.
Prepare the source code and compile.
Open Visual Studio Community, create an APS.Net project, add a NuGet package and compile it, we’ll then copy this web site to the posh and choco web sites and customize.
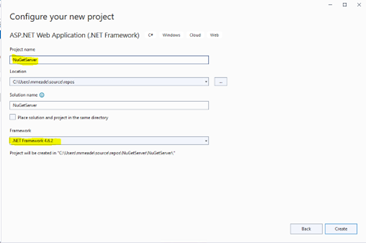
1) Open Visual Studio Community and select Create a new project, select the APS.NET Web Application (.NET Framework).
2) Give the project and arbitrary name like NutGetServer and select .Net Framework 4.6.2.

3) Select an Empty project template.
4) Right click the Project name and select Manage NuGet Packages.
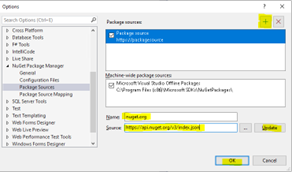
a. If your nuget.org source is missing, you’ll have to add it. Select the gear…

I have noticed this source is missing about 50% of the time, it’s too easy to fix to stress the why…
b. Add the new source, client the Plus sign to add an empty source and configure it:
i. Name: nuget.org
ii. Source: https://api.nuget.org/v3/index.json
c. Click Update and Ok

5) Search for NuGet.Server and select Install.

6) Web. config modifications (added the extra space as the blog engine wouldn't allow that word)
a. Multiple compilation sections – remove the targetframework=”4.6” line

b. Modify the maximum request length and upload length. Replace line with <httpRuntime with the following: <httpRuntime targetFramework="4.6.2" maxRequestLength="2097152" requestLengthDiskThreshold="2097152" executionTimeout="7200" />

c. Modify the requestLimits to its maximum for IIS, <requestLimits maxAllowedContentLength="4294967295" />

d. Modify <add key="apiKey", generate a new GUID in PowerShell with New-Guid, use this as your ApiKey to publish a package.

The rest of the defaults are acceptable…
7) Build your NuGet server and test it with IIS Express
8) Copy the NuGet server to both the PowerShell Gallery and the Chocolatey web sites created earlier. You can edit the web .config to change the API key and to redirect where you want the packages stored, the default is a folder called Packages.
9) Grant the web server identity modify permissions to each web site.
@("C:\inetpub\posh","C:\inetpub\choco") | % {
$folder = Get-ACL -Path $_
$folder.SetAccessRule($(New-Object System.Security.AccessControl.FileSystemAccessRule("IUSR","Modify","ContainerInherit,ObjectInherit","None","Allow")))
$folder.SetAccessRuleProtection($false,$false)
$folder Set-Acl -Path $_
}
10) Test both NuGet sites, https://posh.abc.local and https://choco.abc.local in this example.
Create the boot site and set a PowerShell mime type.
The bootstrap site is just an easy way to publish a PowerShell script to install the basic components for this system, it will do the minimum necessary to allow the system to install the ACS and Build modules, then hand the rest of the install over to function withing those modules, the specifics of this process will be covered in future articles (coming soon).
Set the permissions and mime type for the boot website.
1) Assign IUSR permissions to the boot folder under inetpub
@("C:\inetpub\boot") | % {
If (!(Test-Path -path $_)) {New-Item -Path c:\inetpub -Name boot -ItemType Directory}
$folder = Get-ACL -Path $_
$folder.SetAccessRule($(New-Object System.Security.AccessControl.FileSystemAccessRule("IUSR","Modify","ContainerInherit,ObjectInherit","None","Allow")))
$folder.SetAccessRuleProtection($false,$false)
$folder Set-Acl -Path $_
}
2) Create a mime type for .ps1 as text/plain, open IIS Manager, select the boot site, MIME type and select Add…

Create the DSC Pull site.
Lets use DSC to create the DSC Pull server, the script below creates a configuration mof file in a folder called “CreatePullServer” then invokes the DSCConfiguration.
Install-Module xPSDesiredStateConfiguration
$rootDomain = 'abc.local'
$thumb = (Get-ChildItem Cert:\LocalMachine\My\ | ?{$_.Subject -like "*$rootDomain"}).Thumbprint
configuration CreatePullServer
{
param
(
[string[]]$ComputerName = 'localhost'
)
Import-DSCResource -ModuleName xPSDesiredStateConfiguration
Node $ComputerName
{
WindowsFeature DSCServiceFeature
{
Ensure = "Present"
Name = "DSC-Service"
}
xDscWebService PSDSCPullServer
{
Ensure = "Present"
EndpointName = "pull"
Port = 8080
PhysicalPath = "$env:SystemDrive\inetpub\pull"
CertificateThumbPrint = $thumb
ModulePath = "$env:PROGRAMFILES\WindowsPowerShell\DscService\Modules"
ConfigurationPath = "$env:PROGRAMFILES\WindowsPowerShell\DscService\Configuration"
UseSecurityBestPractices = $true
State = "Started"
DependsOn = "[WindowsFeature]DSCServiceFeature"
}
xDscWebService PSDSCComplianceServer
{
Ensure = "Present"
EndpointName = "compliance"
Port = 8081
PhysicalPath = "$env:SystemDrive\inetpub\compliance"
CertificateThumbPrint = $thumb
State = "Started"
UseSecurityBestPractices = $true
DependsOn = ("[WindowsFeature]DSCServiceFeature","[xDSCWebService]PSDSCPullServer")
}
}
}
CreatePullServer
Start-DSCConfiguration -Path ".\CreatePullServer" -Wait -Verbose
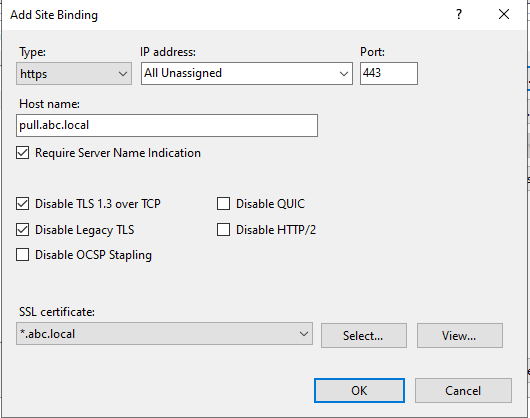
You’ll need to correct the website bindings for both sites, pull and compliance. You’ll want to utilize SNI, disable TLS 1.3 and disable legacy TLS, use your wildcard certificate.

Remove the original bindings for both sites, pull and compliance.
We’ll also cover the Desired State Configuration Pul Server and how we will develop our configurations for configure the environment.
This covers the rudimentary components necessary to create this management system, next is the content we will develop and add to produce the results you which to achieve.
Please follow me for updates when I release new installments to this series. Please contact me at Meade Automation LLC if you wish to engage in contract services to implement this system for your Managed Service Provider (MSP) or Independent Software Vendor (ISV) business.
https://www.meadeautomation.com/
https://www.linkedin.com/company/meade-automation


